http://www.youtube.com/watch?v=nMXVQJ7izHM
http://www.youtube.com/watch?v=YteMYXZqyMs&feature=related
http://www.youtube.com/watch?v=HBusPr5pOaA&feature=related
Wednesday, December 29, 2010
Monday, October 11, 2010
For All Sec 1: Revision Practice
Take a look at the photo below,

(a) Describe a problem you can see from the photo.
(b) Write a design brief.
(c) Write three design specifications based on your design brief.

(a) Describe a problem you can see from the photo.
(b) Write a design brief.
(c) Write three design specifications based on your design brief.
For all S1: Revision Notes 3 (Design)
Hi all,
A recap on design........
A design brief is a short statement stating the purpose on how to solve a design problem.
It starts with ..........Design and make a product ...........
E.g. Design and make a product that shows directions.
A design specifications state the requirements for your design in terms of functions, appearance, size, choice of materials, safety, etc..
It usually starts with........... The product should .........
E.g. The product should be waterproof as it is meant to be placed in an outdoor open space.
For All Sec 1: Revision Notes 2 (Structure - Types of forces)
Hi All,

You need to know the different type of forces acting on the member of a structure.
In summary,
1. A compression / compressive force will cause a member of structure to be squashed. The member that is in compression is called a strut.
2. A tension / tensile force cause a member of structure to be stretched. The member that is in tension is called a tie.
3. A torsion / torsional force cause a member to be twisted.
4. A shear force cause a member to slide/tilt to a side.
More notes on static and dynamic loads and examples of types of forces
-> Click http://www.diydoctor.org.uk/projects/forces.htm
For All Sec 1: Revision Notes 1 (Structure)
Structure terms
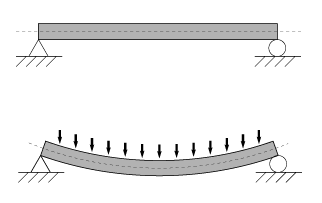
1. Beam - A member of a structure that is supported on two ends to resist bending.

Eg: Bench

Eg: Diving Board, Wings of airplane, Ceiling fan
3. Strut - A member of structure that is subjected to compression.
4. Tie - A member of structure that is subjected to tension.
More examples on tie and strut:
Click on the link -- > http://www.technologystudent.com/struct1/strut1.htm
1. Beam - A member of a structure that is supported on two ends to resist bending.

Eg: Bench
http://upload.wikimedia.org/wikipedia/commons/7/74/Bending.png

Eg: Diving Board, Wings of airplane, Ceiling fan
3. Strut - A member of structure that is subjected to compression.
4. Tie - A member of structure that is subjected to tension.
More examples on tie and strut:
Click on the link -- > http://www.technologystudent.com/struct1/strut1.htm
Wednesday, September 22, 2010
Prelim & O level revision Checklist
Hi Sec 4s,
Click on the link to download the Prelim and O Level study checklist..
https://docs.google.com/document/edit?id=1nCYkgdiy4L5bdaZTv7GgcFURcWhYQthPW-H6n7N5b80&hl=en&authkey=CI7T-6QH
:) All the best to prelim
Click on the link to download the Prelim and O Level study checklist..
https://docs.google.com/document/edit?id=1nCYkgdiy4L5bdaZTv7GgcFURcWhYQthPW-H6n7N5b80&hl=en&authkey=CI7T-6QH
:) All the best to prelim
Friday, August 20, 2010
For S1: What's D&T has to do with COLA?
Hi S1,
Cola is a golden child.... But what's he got to do with D&T??
Stay tuned for more to come in the subsequent lesson........
Right now.. do get to know a bit more, especially his features... Watch this short clip of him...
Enjoy!!!
Cola is a golden child.... But what's he got to do with D&T??
Stay tuned for more to come in the subsequent lesson........
Right now.. do get to know a bit more, especially his features... Watch this short clip of him...
Enjoy!!!
For S4: Contextual Drawing
Hi,
A great way to summarise your idea growing process using the right context.
This is a product design to help carry groceries bag....

Link: http://www.ideagrowing.com/ideagrowing-1.php
A great way to summarise your idea growing process using the right context.
This is a product design to help carry groceries bag....
I thought it was a fabulous piece of contextual drawing...

Link: http://www.ideagrowing.com/ideagrowing-1.php
For S4 - What to include in contextual usage?
HI,
Basically Contextual usage is an opportunity to tell other of the features and functionalities of your product, preferably in pictorial form.
It must include, IN PICTORIAL FORM with some supporting statements
1. concise explanation on the essential functions (how it works, illustration of technology like circuit wiring, mechanism usage, application and ASSEMBLY)
2. explanantion of essential features. For e.g. illustration of height adjustment capability, illustration of collapsible capability, illustration of different usage/outcome in day and at night, illustration of different colour theme for specific purposes, illustration of different switches used for different applications, etc
collapsible means can make it more compact.
Regards
Tuesday, August 17, 2010

Monday, August 16, 2010
For Sec1: Design Opportunities
Hi,
1. What do you understand by 'design opportunities'?
2. Why is it important as a designer to work on any design opportunity?
Below shows two pictures of a place and a product which have numerous design opportunities for you, a designer.
Pic #1

Pic #2:

3. How is 'understanding problem and finding the needs of the user' related to finding design opportunities?
4. What are the design problems you could identify in the two pics that lead to a good design opportunity? Discuss...
Assignment:
1. Find a picture of a situation or product from the newspapers, magazines, internet or you may want to take a photo. Discuss what are the potential design problems you can identify in the pics that lead to design opportunities?
2. Based on the problems you have identified, suggest ways, through sketching, that may lead to good design solution.
For Sec 4E: How to do Contextual Drawing???
Hi Sec 4,
You are at the final phase of the coursework. 1 more week to go before the deadline..
As for contextual drawing, many are still unsure of how it is supposed to be done.
Method 1:
Find the right context picture from internet to fit your 3D drawing that you have drawn earlier. Make sure that the angle and orientation of your 3D drawing is right. Else, you have to draw the 3D product over the context.
Method 2:
You may take a photo of an appropriate context in the angle you would place your product (i.e. 3D drawing). Then, paste or draw the 3D of your product onto the context.
Method 3:
Use Sketchpro software to create your contextual drawing. This is the most professional among all. First, you find the right context and overlay the 3D drawing over.
Below is a video showing how contextual drawing is done.
If the video is too small, you may click on the link here to watch it at youtube.
All the best!!!
TKH
Wednesday, July 21, 2010
Sec 1: Understanding Your Consumer + Assignment
Hi Sec 1s,
Take a look at the two image boards below.
(1) Which target group do you think the designer is targeting at?
(2) What is the lifestyle of this target group?
(3) What do this target group like to do?
(4) What are the characteristics of this target group?


Assignments (26 Jul - 30 Jul):
(All to be done in the A4 exercise book)
1.
Create an image board so that you can better understand the likes, wants, preferances, interests, needs of your target user whom you will be designing the namecard holder for.
2.
Sketch the following objects using crating:

Deadline for both assignments: On the week of 2nd Aug - 6th Aug.
Saturday, July 17, 2010
For my Sec 1: Example of Product Research on Mobile phones
Hi,
 Functions: It is solar powered, waterproof cellphone, which means it can use sunlight for charging. It has a clock display function which makes it very convenient for busy people who have many appointments to meet.

How a designer carried out product research on similar products is very crucial to making his/her new or improved product a success.
As a designer, you need to have an eye for details that pick up the strengths and weaknesses of a product. From there, you can work on the weaknesses and come up with an improved and better version.
Based on the four design considerations you learned earlier, we will use it for the product research looking into the strength and weakness of 1 mobile phone.
 Functions: It is solar powered, waterproof cellphone, which means it can use sunlight for charging. It has a clock display function which makes it very convenient for busy people who have many appointments to meet.
Aesthetics: It is a flip phone with simple and slender design that comes in types of colour. The colours are not vibrant perhaps it is intended to convey the meaning of saving the environment. The solar panel at the centre adds to some dashes of contrast and uniqueness in the design.
Ergonomics: The design is slim such that it can fit into the palm size of user comfortably. It is also thin so that it can put in the pockets easily without creating unsightly protrude in the pants.
Materials: It is made of strong, durable plastic for the exterior so that it can withstand the handling of user and sometimes, absord the impact of a fall.
Conclusion: This type of phone may be suitable for young sportsmen/women who are constantly on the field or executive who are constantly out of office due to its solar powered capability. They do not have to worry about running out of battery.
Do the same evaluation for the 2 mobile phones below in terms of its functions, aesthetics, ergonomics and materials and lastly, make a conclusion on the intended user the design is catering for.


For Sec 1: Topic On Design COnsiderations & Assignment (12 Jul - 16Jul)
Hi my Sec 1 groups,
As a consumer when you want to buy a product, you would consider these following factors on several similar products before you make a decision on which to buy.
Like wise as a designer, we need to consider these factors so that we can better cater to the needs of our potential customers.
These design considerations are:
(1) Function - How the products work? What are the functional features in the product?
(2) Aesthetic/Appearance - How the product looks? What are the designs?
(3) Ergonomics - Is the product easy to use? Is the product comfortable to use? Is the prouct safe to use?
(4) Materials
Assignment (12 Jul - 16 Jul):
You need to find at least 3 pictures, drawings or photos of fun and interesting namecard holders.
You will do a product research on these 3 pictures, comment and compare them based on the 4 design consierations above.
Saturday, June 5, 2010
Production planning
Development Update
Hi,
These are the breakdown of what you might consider under the development in your journal.
The mindmap below outlines some of the factors affecting the development of a design.

Factors to consider in development.
Ergonomics: Design for human usage. For eg. Any parts of the design which has handle / Design that fits into palm size / Design to be wore over the wrist or any bodyparts / Design to be hung on wall. You will have to look into ergonomics. Refer to my previous post on ergonomics or click here for more.
Shapes and Forms: REMEMBER, THE DESIGN FROM IDEATION YOU HAVE CHOSEN IS NOT THE FINAL DESIGN. Parts of the design you can still modify forms further to make it aestetically appealing and ergonomically comfortable and safe.. Click here for reference.
Materials: Have to research and find the right material that will influence the final design. For example: For wearing accessories, what material would be suitable so that it is light? / For the base of CD holder, material that is durable and strong? Click here to find out more and here1 and here2 for more samples.
Function (TECHNOLOGY): What function does your product has? For eg: A product that turns for a few second when activated has to research into and consider on the mechanism (gears) and electronics (motor, timer circuit and its wiring) / A product that produces light may look into different light outputs and circuit design and implementation. Refer here or here for more. For samples of development of mechanism, click here.
Construction/Assembly: You need to plan and detail down how you cut and join each eseential parts in your joournal. It must tie in with your production plan. Prior, Research on the joints and fixings suitable for your design. Click here for more info on joints and fixings. Along the making, do take a snap shot of essential stages and detail down any changes, modifications , challenges in your development in the journal.
Thursday, June 3, 2010
Reminder to S4/5 and 4/6 on O Level Coursework
Hey 45 & 46, To update what I have mentioned earlier we met today (3/6/2010)
Deadline for Journal postponed to 17th June 2010. (with condition attached).
In journal there must be 100% completion of:
(1) Planning and Monitoring
(2) Problem Situation, Analysis, Identification, Selection, Design Brief, Design Spec.
(3) Ideation
(4) Development
(5) Research
Deadline for Artefact postponed to 16th July 2010.
Deadline for Presentation Board will be set at 23rd July 2010.
Over the week, I will post more samples on planning and monitoring chart, production planning, more on development, etc. Stay tuned for more. TKH
Sunday, May 9, 2010
For S2NA/Express D & T MYE 2010
Topics to study,
(1) Design Problem, Brief and Specifications
(2) Ideation (SCAMPER / SHAPE BORROWING)
(3) Orthographic Projection (Drawing of 3 views - Front, Side and Plan)
(4) Mechanism
(a) Names of mechanism and mechanism-part.
(b) 4 different motion involved
(c) Application of mechanism
(5) Electronics
(a) Resistors and calculation of resistance
(b) Electronics name and symbol
(c) Parallel and series arrangement
(6) Isometric Sketching
Topics for S4E D&T MYE 2010
Hi,
All topics that were taught last year will be examined.
The paper is a 2 hours paper. Part 1 comprises 40 marks mainly on design questions. Part 2 comprises 3 elective questions of 20 marks each on electronics, mechanisms and structures question.
For the design question, the following topics in the text are important
(1) ideation technique (SCAMPER, Shape Borrowing, Relay Thinking, etc)
(2) research
(3) Ergonomics and Anthropometry
(4) 3-D drawing (Isometric, Oblique, etc)
(5) 4 stages of design model (Situation, Ideation, Development & Realisation)
(6) Development of project and Evaluation
(7) Planning and Monitoring of Project
For the elective questions, the following topics are important
(1) Electronics
(a) parallel and series arrangment
(b) Resistors, LDR
(c) transistor and sensing circuit
(d) thyristor
(e) Electrolytic and non-electrolytic capacitor
(f) Switches (SPDT, DPDT, etc)
(2) Mechanism
(a) Open and Closed loop system and example
(b) Function of mechanism (To control the speed, to control the motion, etc)
(b) All types of mechanisms, its application and how each mechanism/mechanism-part works with its motion involved (rotary, reciprocating, oscillating and linear).
(3) Structures
(a) Different types of structure (frame/shell/natural/man made) and its functions (support, span, contain , protect).
(b) Different types of load (static and dynamic)
(c) Understand what is truss, cantilever, brace, etc and other structural terms and be able to identify them in practical usage
(d) Different types of forces
(e) Method of reinforcing
(f) Moment of turning
(g) Define the following: strain, elasticity, stress, etc
That's all....All topics can be found in textbook.
All the best and GOod LUck..............
Tuesday, April 6, 2010
Coursework Dateline
P.S. Dateline for Journal Checking is 8th April 2010..
Guys and Gals,
I am sure you know what to focus on right now....
I need to reiterate...
Our dateline for the artifact and the first draft of journal is still 31 May 2010.
Your Planning and Monitoring is important. Do fill in your time chart and keep a regular update on your progress including the conversation details we had over the past few months.
Once term 3 commences, on the 3 periods lesson day, I can concentrate mostly on your presentation board which comprises the isometric presentation drawing, contextual drawing, working (orthographic drawing) and exploded drawing.
For the 2 period lesson, I can focus on your theory. I should be able to do a thorough revision before your O level in November.
Coming to your mid year, pls get your basic concept and knowledge right. Whatever you have been taught last year will be examined. Study your textbook and also the notes and worksheets I have given to you last year.
All the BEST....
P.S. Dateline for Journal Checking is 8th April 2010..
Saturday, April 3, 2010
How to Develop? Part 3
Hey,
Consider quite a number of students who work on electronics. I am going to post some samples of how research of suitable electronics can lead to actual making of the circuit. Below are the pics sample in sequence.
Pic Sample 1: Research on the types of light output.
Pic Sample 2: Research on more light output.
Pic Sample 3: Choice of Light Output After Evaluation
Pic Sample 4: Testing of LEDs.
Pic Sample 5: Circuit Diagram and Wiring of Circuit.
Pic Sample 6: Mounting of Circuit Components.


How to Develop? Part 2
Hey,
In your development, you can work to improve the shapes and forms of essential parts of your product like handle, grip, height, length, etc to improve on its ergonomics aspect.
Do a model on just the essential part like the grip or handle to have a feel of its comfort and ease when holding before finalising the sizing. Try out the model. THIS IS IMPORTANT.

More to Come....
Thursday, April 1, 2010
How To Develop? Part 1
Pls refer to the blog post on WHAT to develop first.
http://dnt-thoughts.blogspot.com/2010/03/development-what-you-should-be-doing.html
I won't be going through every parts detailed detailed in the earlier post on 'what you should be doing for development'.
Put it simply, u develop starts from the final idea and it usually starts with
(1) improving, modifying shapes and forms to make it more ergonomic, aesthetics and functional. (MUS TIE IN WITH DESIGN SPECS). Usually, we consider the different parts of the final design to improve rather than the whole design.
(2) research into the right types of material, evaluate and make a decision on the material you want to use WITH JUSTIFICATION. Again, tie in with DESIGN SPECS.
(3) Research, evaluate and make decisions on technologies for your design to make it more functional and purposeful.
Below is a sample of research into various switches for the input process.

Another sample of technology segment touches on the choice of mechanisms for a toy project.

To know more in detail click on the link. http://www.technologystudent.com/despro2/mech1.htm
(4) Work on the dimension and sizing of your project.
For instance, take human body measurement to decide on the height of a walking toy, the length of the handle and size of the handle grip. See the Pics Below.


You may use maths concept to work out the dimension required. Make a model or mock up to gauge the sizing
You can use similar product research and comparision to roughly guage the size, technology, materials and colour for your idea. For more click here: Similar product comparison: http://www.technologystudent.com/despro2/prod_cp1.html
Make a model to help in making sure your design is going to work or need more modification. It also helps in deciding on the actual sizing. For more click here. Making of model for evaluation: http://www.technologystudent.com/designpro/model1.htm and http://www.technologystudent.com/despro_flsh/modmak1.html.
Ask potential user to feedback and evaluate on your model for improvement or refinement.
Click here: http://www.technologystudent.com/despro2/focgrp1.html
Hand Up Journal for School Checking
Guys and gals,
School is conducting a check on your journal progress. All of you need to hand up this coming Tuesday, 6th April.
Do complete your journal up till development. Look at the development blog post for more information on what is to be included.
I will follow up with some samples on development.
I understand some of you still have bits and pieces yet to complete.
Do complete whatever you are supposed to do, be it pasting of relevant photos, consolidating of research data, etc. PLEASE FINISH THEM BEFORE 6th APRIL...
DO MAKE USE OF THIS LONG WEEKEND TO FINISH UP ESPECIALLY YOUR
1) PLANNING & MONITORING SECTION
2) PROBLEM SITUATION DESCRIPTION, BRIEF,SPECIFICATIONS
3) WHATEVER RELEVANT RESEARCH (PRODUCT RESEARCH, TARGET USER RESEARCH, HUMAN BODY MEASUREMENT RESEARCH, TECHNOLOGY REESEARCH, ETC)
4) 5 GOOD IDEAS WITH EXCELLENT AND THOROUGH MORPHING AND THINKING THROUGH PROCESS.. MUZ TIE IN WITH DESIGN SPECS.EVALUATION ON YOUR DESIGN MUST BE DONE IN ORDER TO SELECT YOUR FINAL IDEAS.
5) DEVELOPMENT
SEE YA...
Tuesday, March 30, 2010
MY THOUGHTS
Hi,
Generally, most of you have started making and you are progessing fine but definitely still more rooms for improvement.
A few still take your time on your journal which is supposed to be done at home. I am disappointed and you are wasting your time away in the workshop. Things in the journal should be done at home. While in the workshop, your focus is in the making.
Development and making should go hand in hand. While you are developing at home, you come to school to verify your development with me and realise your project on what you have developed.
Along the making you make mistakes or need further modifications, detail it in the journal. This is a real-time account of your developmental and making process.
Time is not on our side. Making can only be done in workshop. You cannot bring it back home and do. I want to clear your making asap so that I will have more time to vet through your journal while you are away for mid year exams. I also want to cater time for presentation board.
If you keep harping on working your journal in the workshop, you are going to drag everyone's progress down. In the past, we have two teachers. Allocation of manpower to help student is easier. Now, I am the only one handling your group, I will have to make sure that time is fully optimised. I seek your cooperation in that.
Mr Tan
Development -What You Should be Doing?
Hi, Not sure how to do.... Read below. ASK ME IF NOT SURE...
You should have at least 5 detailed ideas which is thoroughly explored.
For the finalised idea you have chosen, develop on it.
Development.
(1) Improvement on the forms and shapes.
1. Take into account of ergonomics, you may want to modify the shapes
and forms of your final design to make it safer and easy to use
2. Taking into aesthetics/appearance, modify the shapes and forms to make
it more interesting and appealing to your target user.
3. Taking into its functionality and implementability, modify the forms and
shapes to make it more functional.
(2) Types of suitable materials for your design
1.Research on different materials to meet the context and requirement.
2. Evaluate and decide on the material
(3) Dimension and sizing of essential part.
1. Use human measurement (anthorpometry) such as shoe size, human height,
length of arm to determine the essential length/ height of your product
2. If need, use maths (for. eg, trigo) to calculate its dimension
3. Make a model or mock up
(4) Technology
1. Research on different types of technolgy that makes your project function
as intended. Explore various technology means. Do not constraint yourself.
For example:
(a) Mechanism - Research into various mechanisms that opens and closes
the valve to allow dispensing.
(b) Electronics - Research into various electronic component that emits
lights with good illumination. Research into electronic circuit that performs
a particular function such as lights up when darkness falls.
(c) Structure - Research on different means to stabilise your project or
reinforcement needed to increase its strength.
2. Based on the research, evaluate the different technology you researched
and choose a one suitable for your design with explanation and justification
(5) Assembly of parts and technology
(a) Detail down how you would like to make each essential part. Consider different approach. COnsider what machines you can use for making of parts.
(b) Detail how you want to make the technology part such as how and where you want to attach the gears or cams.
(c) Detail how you want to join parts together considering the types of joint
and screw avaliable.
(d) Along the way you are making, you may want to take photos of your making
process.
Friday, March 26, 2010
Wednesday, March 24, 2010
Saturday, February 27, 2010

Ideation Process of Wrist Navigator For NS
Ideation process can be daunting especially if you don't know where to start..

There are many ways to kick start...
#1... refer to your exisiting product research, borrow their forms/shapes.
#2... from your target user analysis, knowing their likes/preferences and work towards the design.
#3... some designs that target user can relate to as in the case of my design of a wrist navigator design.
Since the target is soldier, we can adopt and modify on the designs/forms which they can relate to..

Thursday, February 25, 2010
Create 3D Models With Google SketchUp
For those who are interested into drawing 3D using Google Sketchup. You can download it free by clicking here.
Watch a video of how Google Sketchup can help in your 3D drawing...
Watch a video of how Google Sketchup can help in your 3D drawing...
For Sec 45 & 46 DnT students: Holiday Assignment
Holiday Assignment (13th Mar - 21st Mar)
This shall be part of the grading for your mid year.
Coursework (100 marks)
1) Draw an isometric presentation of your final design on an A3 size paper. You may use ruler to help in your drawing. [50 marks]
Not sure on how to draw isometric…
Click on this link. http://www.mr-d-n-t.co.uk/isometric.htm
You may want to make a few copy of your drawing.
2. Show a contextual use of your product on an A3 size paper. You can source for a suitable context or environment where your product can be used. Your source can come from internet. Print out the context and transfer your drawing taking note of the proportion. [30 marks]
3. Produce an exploded view of your final design on an A3 size paper.
Click on the link below to know more about exploded view.
http://www.mr-d-n-t.co.uk/exploded-view.htm [20 marks]
Deadline: 23rd Mar 2010
For Sec 45 & 46 DnT students: Deadline ..
Hey all, A gentle reminder...
Let's adhere to the deadline... By 30th May 2010..
Our target on 30th May 2010
(1) Artefact to completed.
(2) First draft of Journal Ready.

Let's adhere to the deadline... By 30th May 2010..
Our target on 30th May 2010
(1) Artefact to completed.
(2) First draft of Journal Ready.

For Sec 45 & 46 DnT Students: Things to Do While I am Away ...
Work must still be ongoing while I am away….
You should have completed ….
(1) Planning and Monitoring time line for main tasks and sub tasks.
(2) Problem Analysis with ample research done.
(3) Design Brief and at least 6 good specific/relevant Design Specifications
(4) A finalized idea.
In your journal, You should be continuing/starting to…..(Do AT HOME)
(1) Explore more ideas and forms for your design especially for your FINAL DESIGN. (REMEMBER always to tie in to your design specs.)
HOW TO EXPLORE???
(a) By researching into the forms/shapes that appeal to your target user.
(b) Through existing/similar product analysis and hence borrowing the existing form and shapes, adopting some ideation techniques (SCAMPER, Shape Borrowing, Relay thinking) to develop your truly own design.
(2) [A MUST HAVE] Create a mock-up or model from your finalized idea (THIS IS NECESSARY AND IMPORTANT!!!). Your mock up serves as a communication tool with your teacher and instructors.
(3) Research into relevant technologies for your development.
(a) Types of mechanisms suitable for your technology (For Eg: You may want to research on the types of dispensing mechanism if you are doing some dispenser unit OR explore into different types of mechanism that provides rotary motion if you want parts of your product to rotate OR you have some movement in mind, research into the types of mechanisms that produce these motion [Eg. A rack and pinion produces a linear motion].)
(b) Structures. [Research on how to make your product a stable unit that can stand vertically on the ground? Or What reinforcement to make a frame rigid and not collapse easily? Or the types of joint suitable for product? Or considering the angle inclination of the product in order to make it stable?]
(c) Electronics [For eg. Finding a light beam that facilitates in selection of routes, research into which types of LED or bulbs produces high intensity of light? Or research into which components/circuit can be used in an alarm? Or which types of motor guarantees a high turning speed?]
(4) Development.
(a) Decide and Take down Dimension for your product. It is good to do a mock up considering also the things you want to house in your unit. (For E.g. If you want to house a series of gears, record down the different gears sizes and measurement, that will help to decide your product height OR research into different sizes and length of shoes to help you decide your shoe holder OR research into the sizes of a CD to help you decide how the dimension of opening slot? OR research into the height of a table to help decide in the vertical standing height of your menu holder).
(b) Choice of Materials. [Decide on what material is important…. [Refer back to design spec, if you want to be waterproof, what type of material.. If you are going for light and portability, what types? Going for durability, what types? Again research]
(c) Detail down for e.g. how you are going cut certain materials? For e.g. How to make a slot on that material and the best method you can think of using? How to join certain parts together easily considering several ways? How to assemble the mechanisms to a unit without compromising its forms or other parts?
Making of artifact (ONLY IN WORKSHOP)
You can start your making once you have your finalized idea approved.
You can do your development together with your making.
You can start making a part first (for example, the base or the most essentially part of your artifact). You need to discuss with the teacher and instructor.. You need to draw a 3D sketch of your product or part you are making in your material list with all materials and dimensions listed. IF YOU HAVE A MOCK UP OR MODEL, IT WILL BE MUCH EASIER TO DISCUSS WITH INSTRUCTORS OR TEACHERS.
RECORD DOWN YOUR MAKING PROCESS IN THE JOURNAL. You may take photos of your MAKING stages.
WHAT IF YOU NEED TO MODIFY YOUR DESIGN? Yes, you may if you think it is necessary to add certain parts or modify certain parts or you research on certain shapes that might be a better form for your design… REMEMBER to account in your journal.
I do not want A RE_DO of everything as you should have planned and considered carefully for your design by then..
By 21st March 2010, I would be expecting 75% of your journal done (Problem situation, ideation, development and some evidence of your making process).
To complete at least 15% of your artifact making.
by then..ully for your design. es that might be a better form for your design.RS OR TEACHERS.
n your material list. different d
More Ideation In Process
Sample 1: Ideation In Process for Jewellery Holder

Sample 2: Ideation For Menu Holder


Sample 2: Ideation For Menu Holder

For Sec 45 & 46 Students: Samples of Journal
Attached are some samples of what will be expecting to see in your journal for Problem Situation, User Analysis, Exisiting Product Research, Design Brief & Specs, Ideation and Sketch of Final Design.


The Official Opening of this BLOG!!
Hey all,
This blog is specially created for all my D&T students. It is a platform to share ideas and insights on D&T coursework. Feel free to roam around.
I will update any sharings or ideas as long as I think it is useful to you all.
KH :)
This blog is specially created for all my D&T students. It is a platform to share ideas and insights on D&T coursework. Feel free to roam around.
I will update any sharings or ideas as long as I think it is useful to you all.
KH :)
Subscribe to:
Comments (Atom)